How to fix the GivEnergy GivTCP zero-value problem

Are you seeing the GivEnergy power and energy values in Home Assistant, provided by the GivTCP add-on, suddenly dropping to zero? If you’re using the energy data in your Home Assistant dashboard you might be seeing this issue manifest itself as energy values being doubled compared to what you’re expecting. I’m going to show you a super quick and easy workaround to resolve this problem.
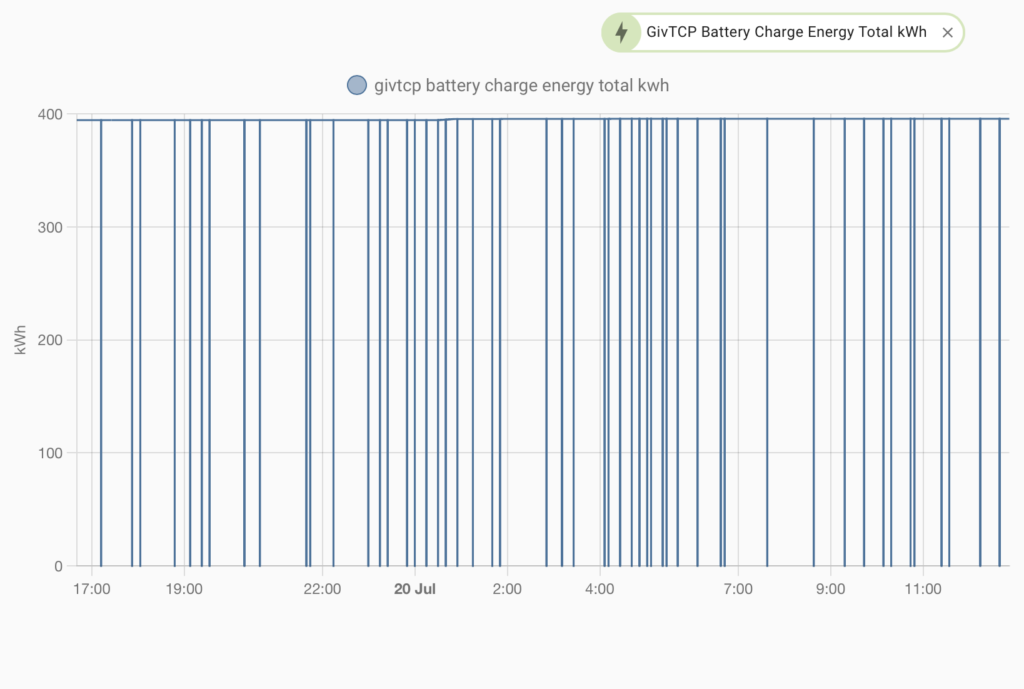
Have a look at this graph - this is showing the total energy going into my battery over 24 hours. You can see that the value keeps dropping to zero. If you use this sensor directly in the Energy Dashboard then each time it drops to zero and jumps back up, the energy dashboard thinks that total change from zero has happened again, so the energy usage that day is counted twice. What we need is a nice smooth graph.

It’s actually quite easy to fix using template sensors but you do need to edit your configuration files manually to achieve it. Take a look at the template sensors below. They're measuring kWh and been given a device_class of energy, and a state_class of total_increasing which means that the value will only ever keep getting higher, as opposed to something like a power sensor or temperature sensor which would have a point-in-time value that goes up and down.
The state of the sensors, or their reported values, is calculated by checking to see if the real sensors, the ones we have a problem with, has a value of zero. If it does, we just use the template sensor’s last known value as the current value. If the real sensor’s value is not zero, then we grab that and use it as this filtered sensor’s value.
template:
  - sensor:
      # ===============================================================
      # GivTCP Filtered
      - name: "GivTCP Battery Charge Energy Total kWh FILTERED"
        unit_of_measurement: 'kWh'
        device_class: 'energy'
        state_class: 'total_increasing'
        state: >-
           {% if states('sensor.givtcp_INVERTERID_battery_charge_energy_total_kwh') | float == 0 %}
             {{ states('sensor.givtcp_battery_charge_energy_total_kwh_filtered') }}
           {% else %}
             {{ states('sensor.givtcp_INVERTERID_battery_charge_energy_total_kwh') }}
           {% endif %}

      - name: "GivTCP Battery Discharge Energy Total kWh FILTERED"
        unit_of_measurement: 'kWh'
        device_class: 'energy'
        state_class: 'total_increasing'
        state: >-
           {% if states('sensor.givtcp_INVERTERID_battery_discharge_energy_total_kwh') | float == 0 %}
             {{ states('sensor.givtcp_battery_discharge_energy_total_kwh_filtered') }}
           {% else %}
             {{ states('sensor.givtcp_INVERTERID_battery_discharge_energy_total_kwh') }}
           {% endif %}


      - name: "GivTCP Import Energy Today kWh FILTERED"
        unit_of_measurement: 'kWh'
        device_class: 'energy'
        state_class: 'total_increasing'
        state: >-
           {% if states('sensor.givtcp_INVERTERID_import_energy_today_kwh') | float == 0 %}
             {{ states('sensor.givtcp_import_energy_today_kwh_filtered') }}
           {% else %}
             {{ states('sensor.givtcp_INVERTERID_import_energy_today_kwh') }}
           {% endif %}

      - name: "GivTCP Export Energy Today kWh FILTERED"
        unit_of_measurement: 'kWh'
        device_class: 'energy'
        state_class: 'total_increasing'
        state: >-
           {% if states('sensor.givtcp_INVERTERID_export_energy_today_kwh') | float == 0 %}
             {{ states('sensor.givtcp_export_energy_today_kwh_filtered') }}
           {% else %}
             {{ states('sensor.givtcp_INVERTERID_export_energy_today_kwh') }}
           {% endif %}

      - name: "GivTCP PV Energy Today kWh FILTERED"
        unit_of_measurement: 'kWh'
        device_class: 'energy'
        state_class: 'total_increasing'
        state: >-
           {% if states('sensor.givtcp_INVERTERID_pv_energy_today_kwh') | float == 0 %}
             {{ states('sensor.givtcp_pv_energy_today_kwh_filtered') }}
           {% else %}
             {{ states('sensor.givtcp_INVERTERID_pv_energy_today_kwh') }}
           {% endif %}
Just paste this template sensor code into your configuration.yaml file, replace INVERTERID with your actual inverter's ID, reload your template sensors on the developer tools page, and you should see new ‘filtered’ sensors appear. Now you can use those sensors in Home Assistant’s energy dashboard with no further problems.
I suggest that at a minimum you create filtered sensors for both the battery energy in and battery energy out sensors, but if you’re using GivTCP to monitor solar and grid too then you can apply the same workaround for those as shown in my config example above.
Bonus Tip
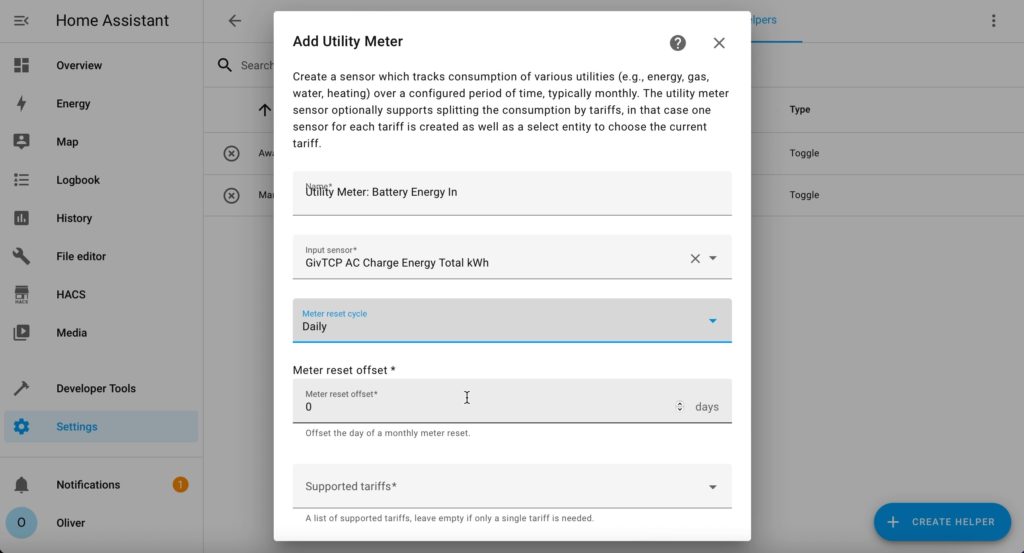
Here’s another little tip, I suggest that you wrap that filtered sensor in a utility meter helper that’s set to a daily cycle. That way you can use the utility meter in your energy dashboard, and if you ever have to change your monitoring solution or battery solution, you can just swap the source entity used by the utility meter and you won’t lose all of that historical data in your energy dashboard.


