
Ripple Energy in Home Assistant (Tutorial)

With Ripple Energy’s community owned wind farms Kirk Hill in Scotland and Graig Fatha in South Wales now live, those of us using Home Assistant to monitor our energy data are probably keen to get hold of that data and display it alongside all of our other energy feeds. Well the good news is that Ripple Energy have an API that you can easily use to grab that data and display it however you like in Home Assistant.
- Find your Ripple API Key
- Install Home Assistant’s File Editor
- Update ‘secrets.yaml’
- Connect to the Ripple Energy API
- Find your Ripple Energy Project ID
- Create Ripple Energy sensors in Home Assistant
- Create a dashboard card
- Home Assistant’s Energy Dashboard
I’m not going to go over what Ripple Energy is in this article, I’ve already made another video about that. I’ll just say that they build wind and solar farms for community ownership and I have shares in the Kirk Hill wind farm which started generating in June 2024. I also have a few shares in the Derril Water solar farm and the Whitelaw Brae wind farm, which are both still under construction and the time of writing.
This tutorial will work for all of those projects once they start providing data to the API, and their first wind turbine at Graig Fatha too. At the time of putting this article together, only Graig Fatha has data available in the API, but Ripple Energy have told me that they hope to have Kirk Hill data in there very soon, possibly by the end of July 2024 so if it’s not there already by the time you read this then it will be soon. So to start this process off, you first need to visit the Ripple Energy web site to get your API Key.
Find your Ripple API Key
- Visit https://www.rippleenergy.com and log in to the ‘Dashboard’
- Click on the profile icon in the top-right and select ‘Settings’ from the drop-down menu
- Scroll down the page until you see the ‘Ripple API’ section and copy the API key somewhere safe for later
Install Home Assistant’s File Editor
If you already have the File Editor add-on installed in Home Assistant or another way of editing your configuration files then you can skip this step. Otherwise…
- In Home Assistant, navigate to Settings > Add-ons
- Click on the “Add-on Store” button in the bottom right
- Click on ‘File editor’ from the list in the ‘Official add-ons’ section
- Click on ‘INSTALL’ and wait for the installation to complete
- Click on ‘START’ and wait for the add-on to start
- Toggle ‘Show in sidebar’ to on and you should see ‘File editor’ appear in the left-hand menu
Update ‘secrets.yaml’
We’re now going to edit the secrets.yaml file in Home Assistant in order to store a special URL referencing the Ripple Energy API.
- Open the File editor add-on from the left-hand menu
- Click on the ‘Browse Filesystem’ icon in the top-left of the File editor
- Scroll down to locate the file named secrets.yaml and click on it
- If you haven’t used this file before it will have a default value in which can be ignored. Add a new line at the end of the file
- Paste in the following line, replacing the word MY_API_KEY with the actual Ripple API key you obtained in the previous step
ripple_energy: https://rippleenergy.com/rest/member_data/MY_API_KEY
- Click on the Save button in the top-right
Connect to the Ripple Energy API
The next step is to add a bit of configuration to create a special sensor which will give us some information to help us create all of the other sensors we need.
- Open the File editor add-on from the left-hand menu
- Click on the ‘Browse Filesystem’ icon in the top-left of the File editor
- Scroll down to locate the file named configuration.yaml and click on it
- Copy the following configuration and paste it into an empty line at the end of the file. Note: if you already have a ‘rest’ section then you will need to merge the following configuration with your existing configuration. If you are applying this to a fairly clean installation of Home Assistant though then this code may be pasted as-is.
rest:
   # ===============================================================
   # Ripple Energy API
   - resource: !secret ripple_energy
     scan_interval: 3600
     sensor:
       - name: "Ripple Energy - All Data"
         unique_id: "ripple_energy_alldata"
         value_template: 'OK'
         json_attributes:
           - generation_assets
- Save the file using the save button near the top-right.
- Check the YAML file to ensure there are no errors by navigating to Developer Tools > YAML (tab at the top) and clicking on ‘Check Configuration’
- Provided there are no errors restart Home Assistant by clicking on ‘Restart’ and choosing the ‘Restart Home Assistant’ option.
Find your Ripple Energy Project ID
The Ripple Energy API will return a list of projects that you have invested in, with various data associated with each project. The order that these projects are listed in vary from user to user therefore we need to find the project you are interested in within the data and work out which position in the list it is.
- Navigate to Developer Tools and choose the ‘States’ tab across the top
- In the ‘Filter Entities’ field type the word ‘Ripple’. You should see an entry named ‘sensor.ripple_energy_all_data’. Select it.
- This should populate a ‘State attributes’ text box. The first line in this text box should be ‘generation_assets:’ and underneath there begins a list of projects.
- Locate the project you are interested in within that list and note its position
- Deduct 1 from the position to come up with a new number. For example, if your project is in the first position in the list, your new number is 0. If the project is second in the list, your number is 1. If the project is third in the list, your number is 2, and so on.
Create Ripple Energy sensors in Home Assistant
Now we have our project ID, we’re going to finish off creating our sensors. Open up File editor and find configuration.yaml. Scroll down to the ‘rest’ section that you pasted in before and add the following additional lines directly underneath:
       - name: "Ripple Energy - Kirk Hill - Energy Generated - Today"
         value_template: '{{ value_json.generation_assets[0].generation.today.generated }}'
         unit_of_measurement: 'kWh'
         state_class: total
         device_class: energy
       - name: "Ripple Energy - Kirk Hill - Earnings - Today"
         value_template: '{{ value_json.generation_assets[0].generation.today.earned }}'
         unit_of_measurement: 'GBP'
         state_class: total
         device_class: monetary
       - name: "Ripple Energy - Kirk Hill - Energy Generated - Yesterday"
         value_template: '{{ value_json.generation_assets[0].generation.yesterday.generated }}'
         unit_of_measurement: 'kWh'
         state_class: total
         device_class: energy
       - name: "Ripple Energy - Kirk Hill - Earnings - Yesterday"
         value_template: '{{ value_json.generation_assets[0].generation.yesterday.earned }}'
         unit_of_measurement: 'GBP'
         state_class: total
         device_class: monetary
       - name: "Ripple Energy - Kirk Hill - Energy Generated - This Week"
         value_template: '{{ value_json.generation_assets[0].generation.this_week.generated }}'
         unit_of_measurement: 'kWh'
         state_class: total
         device_class: energy
       - name: "Ripple Energy - Kirk Hill - Earnings - This Week"
         value_template: '{{ value_json.generation_assets[0].generation.this_week.earned }}'
         unit_of_measurement: 'GBP'
         state_class: total
         device_class: monetary
       - name: "Ripple Energy - Kirk Hill - Energy Generated - This Month"
         value_template: '{{ value_json.generation_assets[0].generation.this_month.generated }}'
         unit_of_measurement: 'kWh'
         state_class: total
         device_class: energy
       - name: "Ripple Energy - Kirk Hill - Earnings - This Month"
         value_template: '{{ value_json.generation_assets[0].generation.this_month.earned }}'
         unit_of_measurement: 'GBP'
         state_class: total
         device_class: monetary
       - name: "Ripple Energy - Kirk Hill - Energy Generated - This Year"
         value_template: '{{ value_json.generation_assets[0].generation.this_year.generated }}'
         unit_of_measurement: 'kWh'
         state_class: total
         device_class: energy
       - name: "Ripple Energy - Kirk Hill - Earnings - This Year"
         value_template: '{{ value_json.generation_assets[0].generation.this_year.earned }}'
         unit_of_measurement: 'GBP'
         state_class: total
         device_class: monetary
       - name: "Ripple Energy - Kirk Hill - Energy Generated - Last Week"
         value_template: '{{ value_json.generation_assets[0].generation.last_week.generated }}'
         unit_of_measurement: 'kWh'
         state_class: total
         device_class: energy
       - name: "Ripple Energy - Kirk Hill - Earnings - Last Week"
         value_template: '{{ value_json.generation_assets[0].generation.last_week.earned }}'
         unit_of_measurement: 'GBP'
         state_class: total
         device_class: monetary
       - name: "Ripple Energy - Kirk Hill - Energy Generated - Last Month"
         value_template: '{{ value_json.generation_assets[0].generation.last_month.generated }}'
         unit_of_measurement: 'kWh'
         state_class: total
         device_class: energy
       - name: "Ripple Energy - Kirk Hill - Earnings - Last Month"
         value_template: '{{ value_json.generation_assets[0].generation.last_month.earned }}'
         unit_of_measurement: 'GBP'
         state_class: total
         device_class: monetary
       - name: "Ripple Energy - Kirk Hill - Energy Generated - Last Year"
         value_template: '{{ value_json.generation_assets[0].generation.last_year.generated }}'
         unit_of_measurement: 'kWh'
         state_class: total
         device_class: energy
       - name: "Ripple Energy - Kirk Hill - Earnings - Last Year"
         value_template: '{{ value_json.generation_assets[0].generation.last_year.earned }}'
         unit_of_measurement: 'GBP'
         state_class: total
         device_class: monetary
       - name: "Ripple Energy - Kirk Hill - Energy Generated - Total"
         value_template: '{{ value_json.generation_assets[0].generation.total.generated }}'
         unit_of_measurement: 'kWh'
         state_class: total
         device_class: energy
       - name: "Ripple Energy - Kirk Hill - Earnings - Total"
         value_template: '{{ value_json.generation_assets[0].generation.total.earned }}'
         unit_of_measurement: 'GBP'
         state_class: total
         device_class: monetary
This example assumes that you are creating sensors for Kirk Hill. If this is not the case, simply replace the words ‘Kirk Hill’ with the actual name of the site you require in all places throughout this configuration. Next, note the lines containing the text ‘generation_assets[0]’. That zero (0) must be replaced in all places with the actual project ID that you discovered in the previous step. So if your project ID was 1, then make sure that every instance of generation_assets[0] is replaced with generation_assets[1]. Once updated, save the file and visit developer tools to check the configuration. If all is ok, restart Home Assistant to apply the changes.
Once restarted, navigate to Settings > Devices & Services > Entities (tab at the top). Filter the list by the word ‘Ripple’ and you should see all of the new project entities listed.
Create a dashboard card
You’re now probably going to want to display this data on your Home Assistant dashboard somehow. You may have a preferred way to do this, but I’m going to show you my suggestion. This card requires a number of custom frontend components to be installed via HACS. If you don’t already have HACS installed then you might want to follow my guide here. Once up and running with HACS, use it to install the following frontend components:
- Mushroom Cards (allows us to create custom template cards)
- card-mod (allows us to customise cards with CSS)
- Stack In Card (allows us to add a background image to a card)
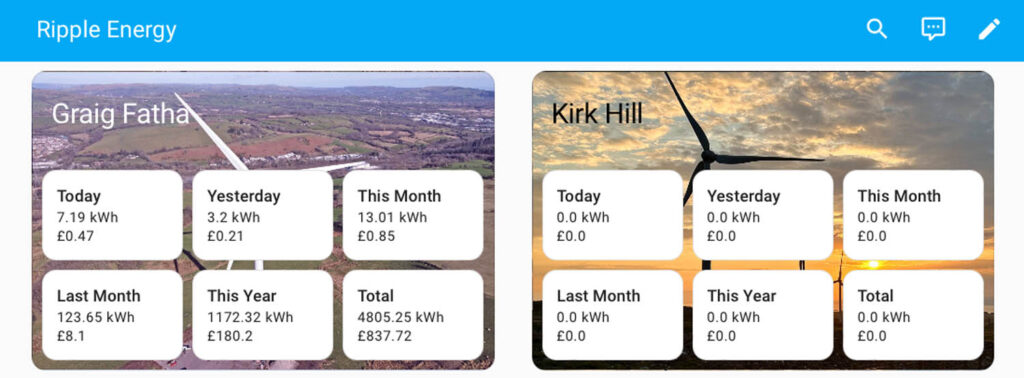
This card displays a background image behind the data. You can use any .jpg image you like, but in my video tutorial I used these ones taken from Ripple Energy’s Twitter/X feed:
- Kirk Hill: https://x.com/RippleEnergy/status/1798347506226471117
- Graig Fatha: https://x.com/RippleEnergy/status/1687060376926486530
Once you have your preferred jpg image, open the File editor add-on and click on the Browse filesystem button in the top-left. Scroll down to find the folder named ‘www’ and select it. Click on the ‘Upload File’ arrow icon at the top, browse to locate your file and upload it by following the prompts.
Next, Browse Filesystem again and jump back up a folder level to locate configuration.yaml, selecting it to edit. Near the top of this file will be a line saying ‘default_config:’. We need to add two more lines directly underneath that line so as it reads as follows:
default_config:
  whitelist_external_dirs:
    - '/config/www'
These additional lines give Home Assistant permission to display files located in the www folder into which you just uploaded the image. You must now restart Home Assistant via Developer Tools for this change to be applied.
Once rebooted, edit the dashboard on which you would like to place the card. Add a new card and scroll down to find the type of ‘Manual’ and select it. Delete the default lines of configuration in the Manual card and paste in the following:
type: custom:stack-in-card
mode: vertical
title: Kirk Hill
keep:
  margin: true
  background: true
  border_radius: true
card_mod:
  style: |
    ha-card {
      background: url('/local/windfarm_kirkhill01.jpg');
      background-size: cover;
      overflow: hidden;
      --ha-card-header-color: black;
    }
cards:
  - type: grid
    square: false
    cards:
      - type: custom:mushroom-template-card
        primary: Today
        secondary: >-
          {% set earned_entity = entity|replace('energy_generated','earnings')
          %}

          {{states(entity)}} kWh

          £{{states(earned_entity)}}
        icon: ''
        entity: sensor.ripple_energy_kirk_hill_energy_generated_today
        badge_icon: ''
        multiline_secondary: true
        tap_action:
          action: more-info
        icon_color: green
      - type: custom:mushroom-template-card
        primary: Yesterday
        secondary: >-
          {% set earned_entity = entity|replace('energy_generated','earnings')
          %}

          {{states(entity)}} kWh

          £{{states(earned_entity)}}
        icon: ''
        entity: sensor.ripple_energy_kirk_hill_energy_generated_yesterday
        badge_icon: ''
        multiline_secondary: true
        tap_action:
          action: more-info
      - type: custom:mushroom-template-card
        primary: This Month
        secondary: >-
          {% set earned_entity = entity|replace('energy_generated','earnings')
          %}

          {{states(entity)}} kWh

          £{{states(earned_entity)}}
        icon: ''
        entity: sensor.ripple_energy_kirk_hill_energy_generated_this_month
        badge_icon: ''
        multiline_secondary: true
        tap_action:
          action: more-info
      - type: custom:mushroom-template-card
        primary: Last Month
        secondary: >-
          {% set earned_entity = entity|replace('energy_generated','earnings')
          %}

          {{states(entity)}} kWh

          £{{states(earned_entity)}}
        icon: ''
        entity: sensor.ripple_energy_kirk_hill_energy_generated_last_month
        badge_icon: ''
        multiline_secondary: true
        tap_action:
          action: more-info
      - type: custom:mushroom-template-card
        primary: This Year
        secondary: >-
          {% set earned_entity = entity|replace('energy_generated','earnings')
          %}

          {{states(entity)}} kWh

          £{{states(earned_entity)}}
        icon: ''
        entity: sensor.ripple_energy_kirk_hill_energy_generated_this_year
        badge_icon: ''
        multiline_secondary: true
        tap_action:
          action: more-info
      - type: custom:mushroom-template-card
        primary: Total
        secondary: >-
          {% set earned_entity = entity|replace('energy_generated','earnings')
          %}

          {{states(entity)}} kWh

          £{{states(earned_entity)}}
        icon: ''
        entity: sensor.ripple_energy_kirk_hill_energy_generated_total
        badge_icon: ''
        multiline_secondary: true
        tap_action:
          action: more-info
    columns: 3
This example is for Kirk Hill. You will need to customise as appropriate:
- The line starting ‘title:’ can be changed to match whatever project name you are creating a card for
- The filename in the line background: “url(‘/local/windfarm_kirkhill01.jpg’);” should match the name of the jpg file you uploaded
- The line “–ha-card-header-color: black;” can be altered to a different colour value. This will change the colour of the title text.
- All lines starting with “entity:”, for example “entity: sensor.ripple_energy_kirk_hill_energy_generated_today” must be customised to reference the actual entities for the project you are display. Usually this would involve just changing the text “kirk_hill” to another project name such as “graig_fatha”. This must be done in six locations.
Home Assistant’s Energy Dashboard
The Energy Dashboard in Home Assistant isn’t currently designed to deal with any generation sources apart from solar. You therefore have to include your wind farm as solar generation (which may be appropriate for Derril Water) AND as ‘Return to grid’, similar to your own export. This is because if you just add it as ‘return to grid’ then your Home demand will be incorrect as it’ll assume you used less and exported more. If you add your project’s energy generation to the solar generation too then Home Assistant will see that you have both generated it and then exported it meaning it still sees your home’s demand. Navigate to Settings > Dashboards and select the ‘Energy’ dashboard to configure it.
Click ‘Add return’ under ‘Return to grid’. Locate your total energy generation entity in the drop-down. For example, for Kirk Hill this would be ‘sensor.ripple_energy_graig_fatha_energy_generated_total’. Select the option for ‘Use an entity tracking the total received money’ and locate your total earning entity. For example: sensor.ripple_energy_graig_fatha_earnings_total. Save, and then add a new solar generation entity for the energy sensor (e.g. ‘sensor.ripple_energy_graig_fatha_energy_generated_total’). Save again then open your Energy Dashboard to check that the new entity appears in the Sources table. It may take a few hours for data to start appearing the table and graphs.