Apple HomeKit and Reolink Doorbells & Cameras

If you’re an Apple user then you’ll know that the Apple Home app is a really convenient place to control your smart devices, especially as those devices can be controlled from your iPhone, iPad, Mac or even Apple TV. If fact, it’s my Apple TV that I really want my Reolink doorbell to work with so as when someone presses the button on my doorbell, I get a nice pop-up image on my TV so as I can see who it is.
- Home Assistant Introduction
- Reolink Configuration
- Home Assistant: Reolink Integration
- Home Assistant: HomeKit Bridge Integration
- Apple Home App Configuration
- Limitations and Conclusions
Home Assistant Introduction
Now there are a number of ways of getting your Reolink devices to appear in Apple Home but I’m going to show you what I think is the simplest. It uses Home Assistant and it really does rely on you already having Home Assistant up and running. If you don’t, then you are going to need to look in to that because whatever method you choose you are going to need a dedicated little device that acts as a bridge between Apple Home and Reolink. The easiest way to run Home Assistant is on a Raspberry Pi. You just install Home Assistant to a microSD card using the Raspberry Pi imager software, stick the card in the Pi and power it on. There’s a bit of a set-up wizard to run through but nothing too difficult.
You can of course run it on an old PC or laptop, or a NAS as a Docker container or virtual machine, but they’re not easy methods for beginners. This little tutorial will assume that somehow you have already got Home Assistant up and running, and it’s the Home Assistant OS version, not just the Docker container. If you go down the Docker route, you’ll need to do more work to get it working than I’m going to cover in this video. Anyway, before we look at the Home Assistant side of things, we need to make sure our Reolink cameras are configured properly.
Reolink Configuration
So you’ve got your camera or your doorbell all up and running in the app on your phone, but unfortunately you can’t make advanced configuration changes using the app. You have to go and get the desktop software for Mac or Windows from their web site to do that. Visit the following URL, download the desktop software, install it and make sure you add your cameras (or Home Hub or NVR) to the devices list:
https://reolink.com/software-and-manual
Now in my case I have all of my cameras connected to a Reolink Home Hub, so I need to configure the settings on the Home Hub itself. The same applies if you have a Reolink NVR, you want to configure the NVR not the cameras themselves. If you don’t have a Home Hub or NVR then you’ll need configure each camera directly and individually. What we basically need to achieve is enabling the settings that allow your camera feeds to be viewed on your local network by third party software.
Within the Reolink software, open up the settings for your device - in my case, this the Home Hub and it's done by clicking on the > right arrow for the device as shown in the screenshot. If you have a Home Hub, you'll then need to select 'Customise' (this step is not necessary when configuring a camera directly). From the settings page, choose 'Network', the 'Advanced' option, and finally 'Server Settings'. On this page, you will need to enable the HTTP, HTTPS, RTSP and ONVIF options, leaving the port values as their defaults. Click on save.
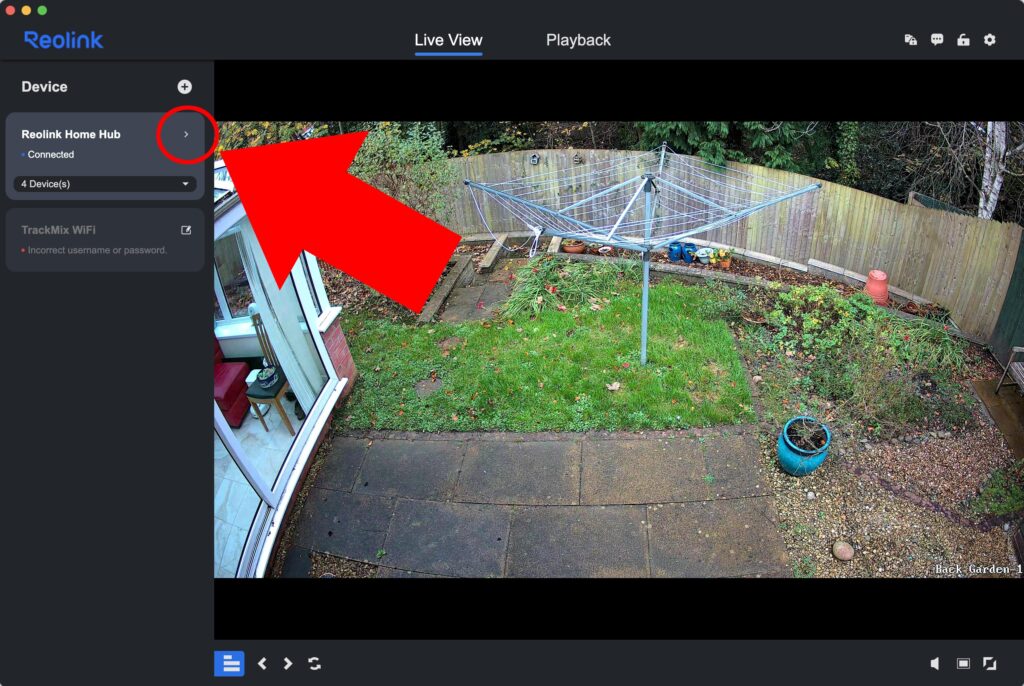
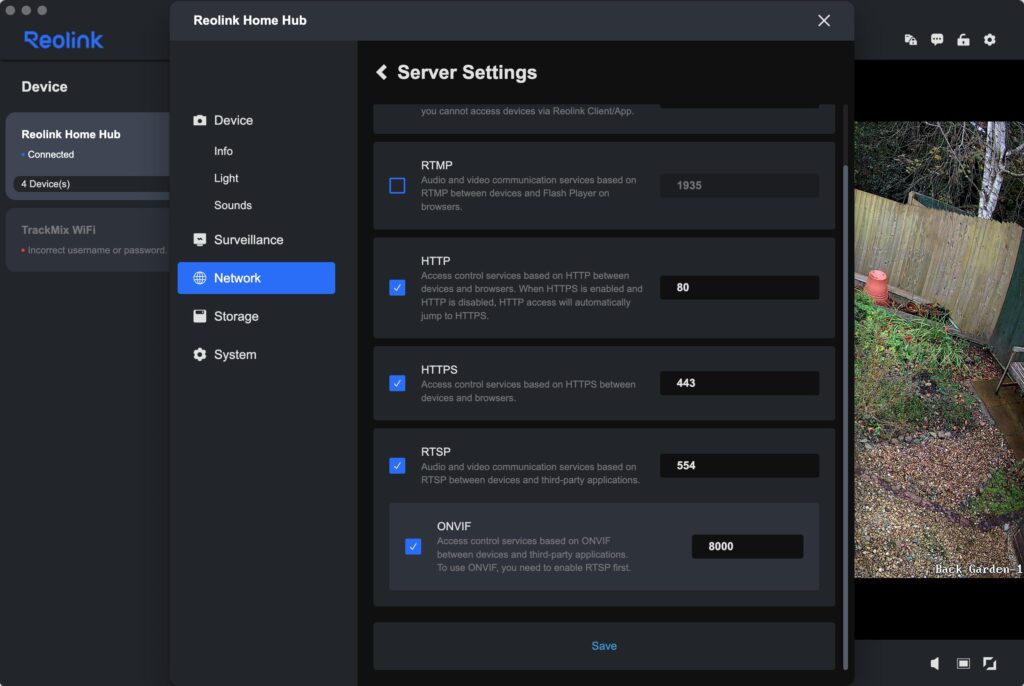
Before you leave the Reolink app, go back to 'Network' and open the 'Network Information' page. Make a note of the IP address of your device because you'll need that later...

Home Assistant: Reolink Integration
Now it’s time to jump on over to Home Assistant and make sure it can communicate with your cameras. From your Home Assistant dashboard, do the following:
- Navigate to Settings > Devices & Services, you should find yourself on the 'Integrations' page by default.
- Click on the 'Add Integration' button in the bottom right corner of the page.
- Search for the 'Reolink IP/NVR camera' integration and select it.
- When you first set up your camera, NVR or Home Hub, you will have been asked to set up a password - this is different to your Reolink account username and password. Enter the password in the password field, noting that the default username is 'admin' unless you have changed that.
- Remember the IP address I asked to you make a note of in the previous section? Well type that into the Host field.
- Click on Submit and hopefully, if everything was configured correctly, it should add all of your cameras as devices.
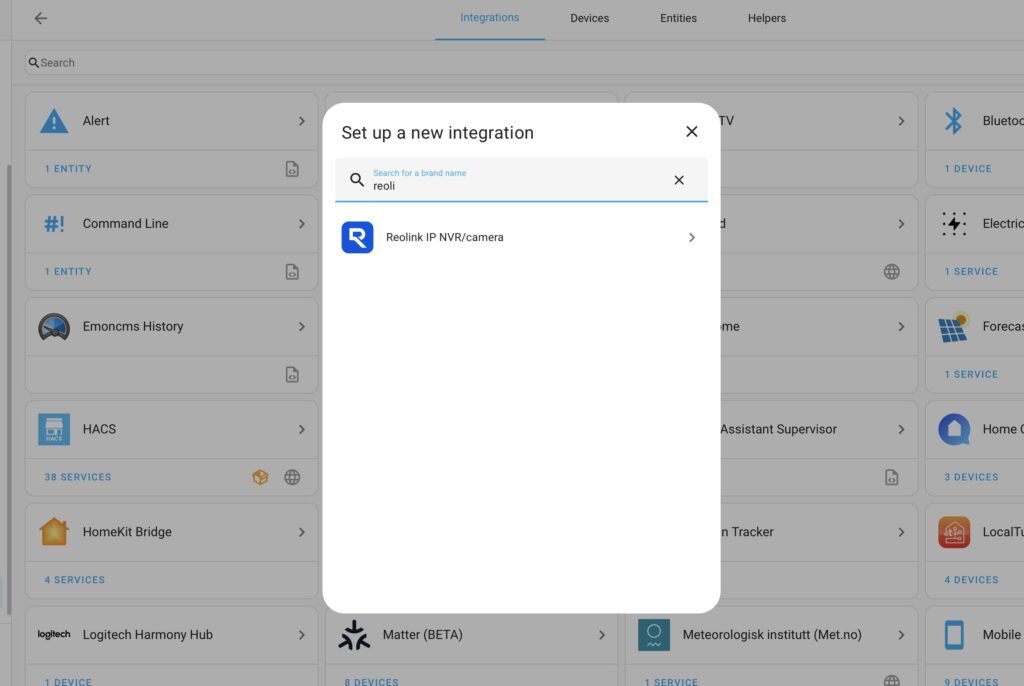
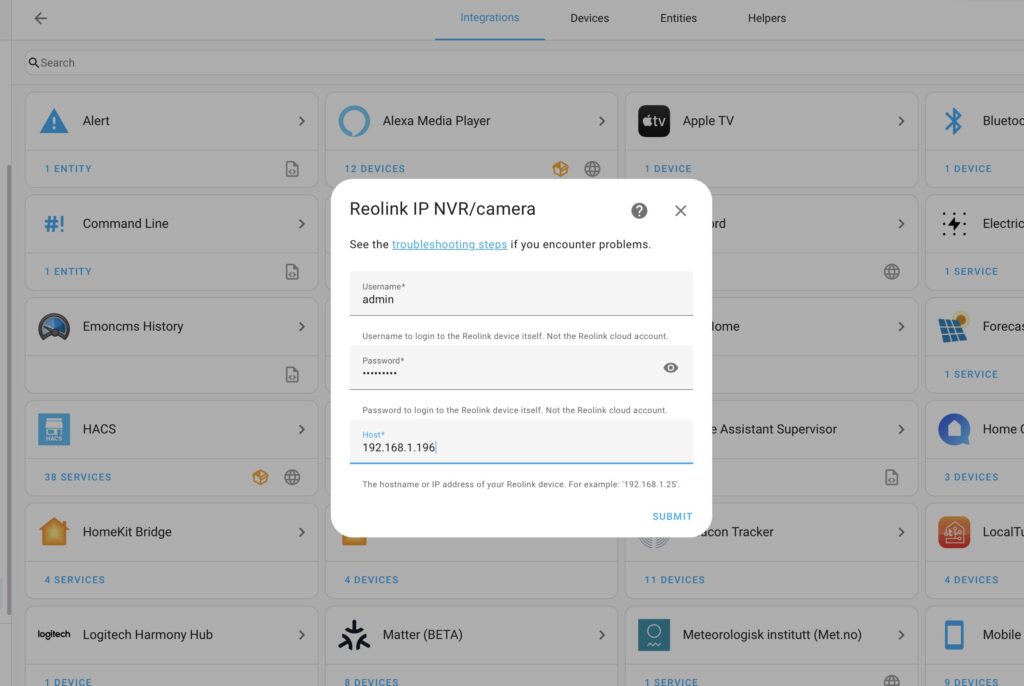
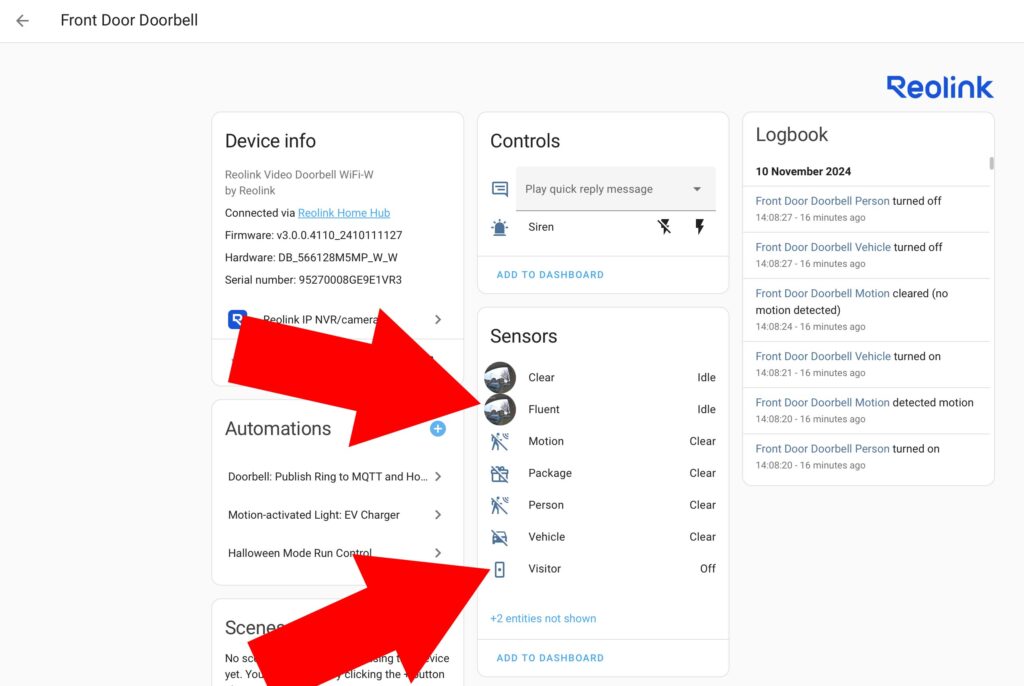
Now view the devices list for the Reolink integration and find the first device you wish to add to the HomeKit integration. In my example here I'm going to be adding my Reolink Wired WiFi Doorbell.
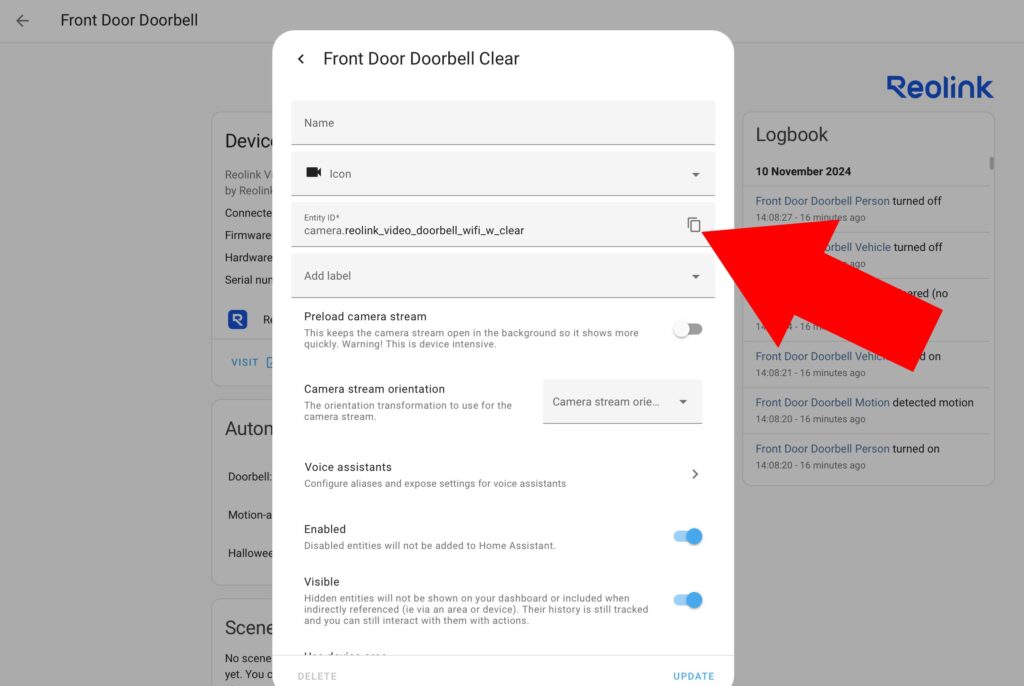
On the device page for your camera, you need to find the entity ID for the video feed. My suggestion is to look for the 'fluent' entity. This is the low resolution video feed and will likely work faster and use fewer resources (memory and processing) on your Home Assistant server. You can also use the 'clear' feed if you like, which is the full resolution video feed. Select the camera entity from the device page, click on the settings cog on the top-right of the window that appears, and then copy the entity name somewhere safe to use later.
If you are configuring a doorbell then you will also want to find the entity ID of the doorbell's button. This is called 'Visitor', so select that entity too and find the entity ID in the same way.
Home Assistant: HomeKit Bridge Integration
Next we have to configure Home Assistant’s HomeKit Bridge integration but in order to do that we have edit its configuration file. The easiest way to do that is by installing the File Editor add-on. You can do this by navigating to Settings > Add-ons, clicking the blue Add-on Store button in the bottom right, finding the 'File editor' add-on from the list, selecting it and clicking on 'Install'. It may take a couple of minutes to install, but once it has you should start it and select the option to add to the sidebar for convenient access.
Open File editor and use it to open the configuration.yaml file. Make some space at the end of the file and paste in the following configuration:
homekit:
  - name: Front Door Doorbell
    port: 51829
    mode: accessory
    filter:
      include_entities:
        - camera.YOUR_DOORBELL_CAMERA_ENTITY
    entity_config:
      camera.YOUR_DOORBELL_CAMERA_ENTITY:
        name: Front Door Doorbell
        linked_doorbell_sensor: binary_sensor.YOUR_DOORBELL_CAMERA_VISITOR_SENSOR
        support_audio: true
A few things to mention here - replace the camera.YOUR_DOORBELL_CAMERA_ENTITY text with the actual camera entity ID that you obtained after adding the Reolink integration. This needs to be done in two places: the include_entities section in the list, so it starts with a '- ' (dash and a space); in the entity_config section, and make sure it ends with a colon ( : ).
The first 'name' item is the name of the accessory "bridge" which will appear in HomeKit when you add it, but the second 'name' item under the entity_config section is the actual name label that you will see against the device in the Apple Home app. They can be the same, or different, it's up to you!
The 'port' item must be a unique number. Cameras are added to Apple Home in 'accessory' mode, which means we add them as a single device individually - you pair each camera separately to Apple Home. The alternative mode, known as 'bridge', lets you link multiple devices to Apple Home under a single pairing but cameras are less reliable in that mode. I've used the port number 51829, you can also use this, but if you add multiple cameras then you must increment this value, i.e. your second camera will use 51830, the third 51831 and so on.
The support_audio item is set to true. If you remove this line, or set it to false then you will not be able to hear any audio from the cameras in the Home app.
And finally, the linked_doorbell_sensor item is optional and can be removed if you are setting up just a normal camera. But, if you have a doorbell then you must replace binary_sensor.YOUR_DOORBELL_CAMERA_VISITOR_SENSOR with the actual binary_sensor entity of the Visitor sensor you obtained after configuring the Reolink integration.
There are other settings you can tweak too if you'd like, and if you're interested then you should check out the official documentation here: https://www.home-assistant.io/integrations/homekit/
Save the configuration file, navigate to Developer Tools, check the configuration to make sure no errors are returned and restart Home Assistant to enable the HomeKit Bridge integration you've just configured.

Apple Home App Configuration
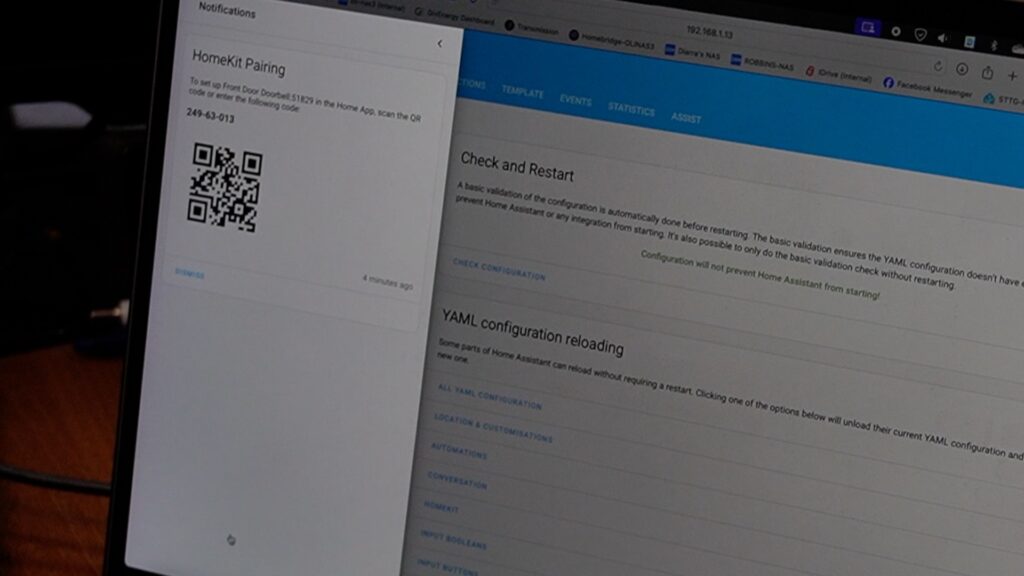
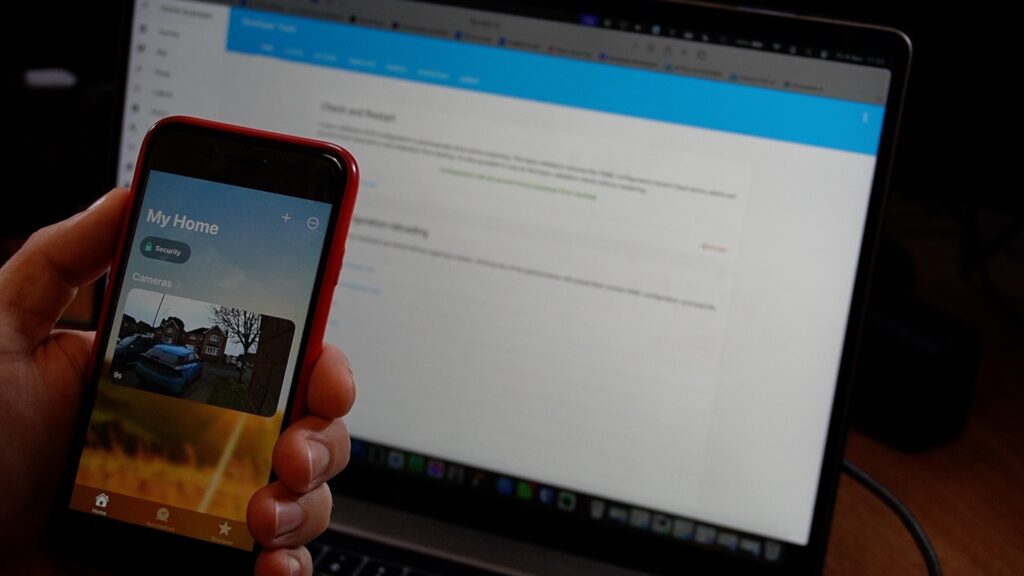
Once Home Assistant has rebooted, you should notice a new notification in the Notifications menu on the left-hand side of Home Assistant's dashboard. When you open the notifications window you should see a QR code for you to scan, so open the Home app on your iPhone, tap to add an accessory, scan the code when promoted and following the installation instructions. When complete, you should see a thumbnail of your camera's video feed on the Home Screen. Tapping on that thumbnail should open up the live view.
You can now go and test pressing the doorbell if appropriate and you should also see a notification from that.
Limitations and Conclusions
Hopefully soon Reolink will add HomeKit or Matter support for their devices natively, but until then I reckon this is the best way add that missing functionality. There are a few limitations of this solution though.
- Doorbell notifications require you to have an Apple HomeKit Hub of some variety. This is an always-on devices located in your home. It might be an Apple TV, a HomePod, or even an iPad. The hub will also let you view your camera feeds and get notifications from them via the Home app when you are away from your local network.
- Two-way audio doesn't work via the Home app to the shared cameras yet. I don't know why, I don't think this is a technical limitation, I think it's just something that's not yet been added by the community who develop the Reolink Home Assistant integration. If that situation changes, I'll update this article!


